
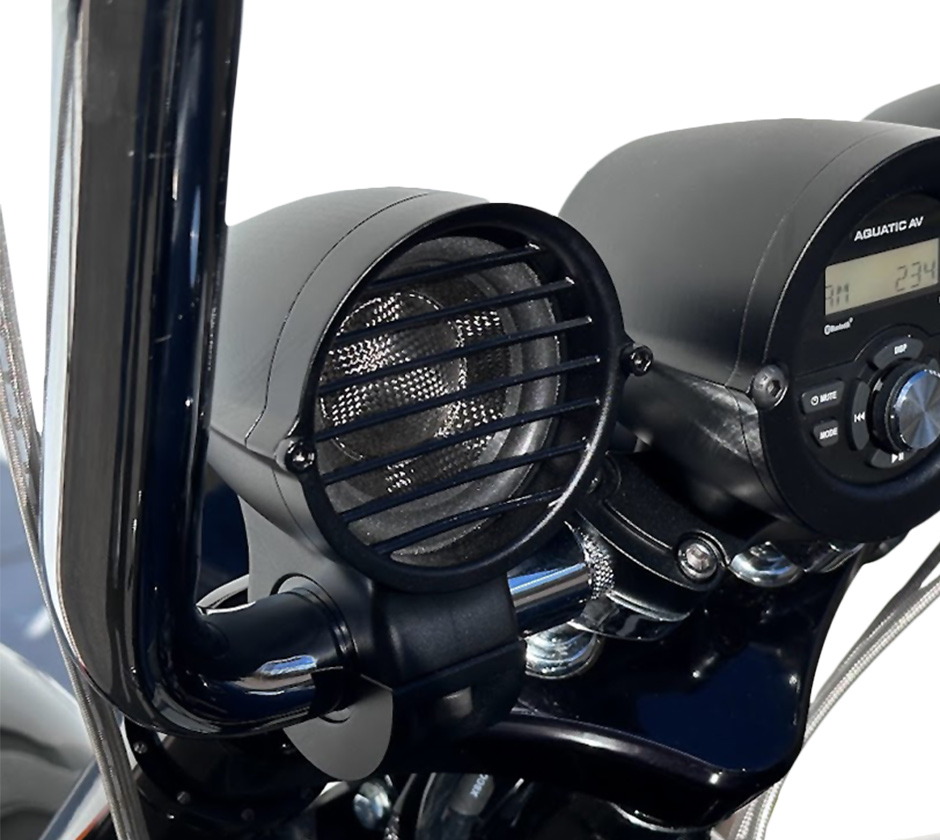
Installation Orientation
You may install the speaker pods either horizontally, at the base of the handlebars (on either side of the clamping area), or vertically on the uprights of the bars. The speaker pods are designed to fit on either side of the Stereo Pod on most OEM width Road King handlebars, though some narrow ape hangers will require a vertical installation.
OEM and Aftermarket Bars
Your speaker pods are engineered for a precision fit across all common handlebar diameters. The heavy-duty clamps are designed for a direct-fit on 1.5" bars without the use of shims. For riders with 1.25" or 1" bars, please use the provided precision-fit shims.
Simply seat the shims inside the top and bottom clamp halves before securing the mounting bolts.
Fastening To the Bars
Step 1: Surface Preparation
Clean the mounting area on your handlebars (The Base or Uprights) to remove any wax or road grime.
Optional: There are 4 x 1mm adhesive silicone strips in the kit. If you wish to provide an extra layer of protection for your handlebar's chrome or powder-coat, apply these strips to the bar surface before installing the clamps. This not only prevents metal-on-metal contact but provides an additional 'grip layer' to ensure your pods stay locked in position, even under high vibration.
Step 2: Position & Hold (We strongly recommend a Second Set of Hands)
Person A: Hold the speaker pod in the desired position. If your bar diameter is 1.25" or 1", Person A will also hold the top and bottom precision-fit shims inside the clamp halves.
Step 3: Seating the Bolts
Person B: Align the pod over the bar and shims. Apply a few drops of medium strength (blue) Loctite to the threads (such as Loctite 242 or 243). Thread the 5/16-18 stainless steel bolts into the billet pod by hand. Note: Always start these bolts by hand to ensure they are properly threaded into the aluminum housing before using a tool. Do not cross thread.
Step 4: Alignment & Final Torque
These shallow cap screws use a 5/32” Allen key. While Person A maintains the desired angle and position of the pod, Person B should tighten the bolts evenly, alternating between the two to ensure the clamp gap remains uniform on both sides.
Final Torque: Tighten to 14–16 ft-lbs. This provides maximum clamping force without risking damage to the billet aluminum threads..
Double-check your bolt tightness after your first 50 miles of riding. Handlebar vibrations are unique to every bike, and a quick 'snug-check' ensures your system stays exactly where you put it.
Speaker Wiring
Speaker wiring exits at the rear, at the base of the billet speaker pod. This hole is intentionally left open and does not utilize a rubber grommet. This is a deliberate design choice engineered for the motorcycle environment. In outdoor applications, temperature swings can cause internal condensation; leaving this port open at the lowest point of the housing allows any moisture to gravity-drain safely away from the internal components.
Furthermore, this aperture acts as a secondary pressure relief vent for the high-output ST3J10 driver. By allowing the pod to 'breathe,' we ensure the 35.5mm voice coil remains cool and the acoustic pressure remains balanced, delivering consistent, distortion-free performance even during long rides in varying climates.
While our 'Breathe & Drain' design handles moisture through airflow, gravity is your best friend. If your specific mounting style places the hole at the top, a small loop in the wiring harness (a 'drip loop') before it enters the pod will prevent rainwater from following the wire directly into the housing.
Finalizing Your Speaker Wiring
If you purchased your speakers as part of a Havoc Roar Kit, the leads are terminated with Deutsch DTM waterproof connectors that mate with the connectors on the head unit and amplifier. Simply note left and right, and plug them in. You're done.
The wiring from your pods is intentionally left long to accommodate everything from low Beach Bars to Ape Hangers. Excess wire can be carefully gathered in a tight loop and secured inside the headlight nacelle.
Route the speaker wires from your pods down the handlebars and through the nacelle cap into the headlight housing, and then out of the nacelle to the left side of the steering neck (where the stereo power harness lives).
On the stereo harness, there are two small 2-pin Deutsch connectors - these are the mini DTM connectors for the speakers. Simply plug in the speakers, then use the supplied cable tie to secure the two speaker leads to the main harness.
Sound Tuning
Your new handlebar speakers use the ST-3J10 SB Audiophile high-output driver. These feature high-performance 89mm drivers equipped with massive 35.5mm voice coils for unmatched power handling in their class: they deliver a sustained 100 dB+ of crystal-clear output at maximum volume, specifically tuned to outperform ambient wind and engine noise.
These carbon-fiber drivers are high-output performers, but like any precision instrument, they have a 'redline.' For that reason, your head unit system is tuned from the factory for optimum performance. Also, to protect your high-performance investment, every 3.5” speaker includes a custom-engineered Nichicon Muse Premium Audio high-pass filter.
We’ve tuned our filtering precisely to 241Hz, which ensures that even at Max Volume, the speakers remain in their 'sweet spot,' filtering out damaging sub-bass distortion while delivering crystal-clear mids and highs that cut through wind and engine noise.
With this factory tuning, you can crank the volume to Max (40 on the dial) and enjoy without worrying about damaging your speakers.
The GP1 head unit does have an onboard digital equalizer that allows you to change the sound profile. Depending on the type of music you listen to, some fine adjustments may enhance your sound enjoyment. However, if you hear any sound distortion at full volume, turn the setting back to a point where distortion is not present.
Please note: blown speakers resulting from over-driving the system (too much bassinduced distortion) caused by altered EQ settings that induce distortion are not covered under warranty. Play it loud, but play it smart!
Here’s why: Distortion (clipping) – mainly caused by too much bass - will damage these speakers in a couple of ways: first, it creates too much heat, and second, it causes the voice coil to jump violently – both of which will damage your speaker.
But – and this is important - on motorcycle, you are unlikely to hear low-end bass frequencies on the road anyway, as they are naturally canceled out by wind and exhaust roar the moment you start moving. By staying within the speakers’ "Sweet Spot" that we set for you, you ensure that 100% of your power is going toward the crisp, mid-range punch you can actually hear.
Enjoy the new soundtrack to your ride!
PARTS INCLUDED:
- 2 x Billet Pods with Clamps, Loaded with 3.5” Speakers
- 4 x 1 mm Silicone Gaskets (for handlebar protection)
- 4 x Billet Shims for 1.25” Handlebars
- 4 x Billet Shims for 1” Handlebars
- 1 x 4” UV Resistant Cable Tie