
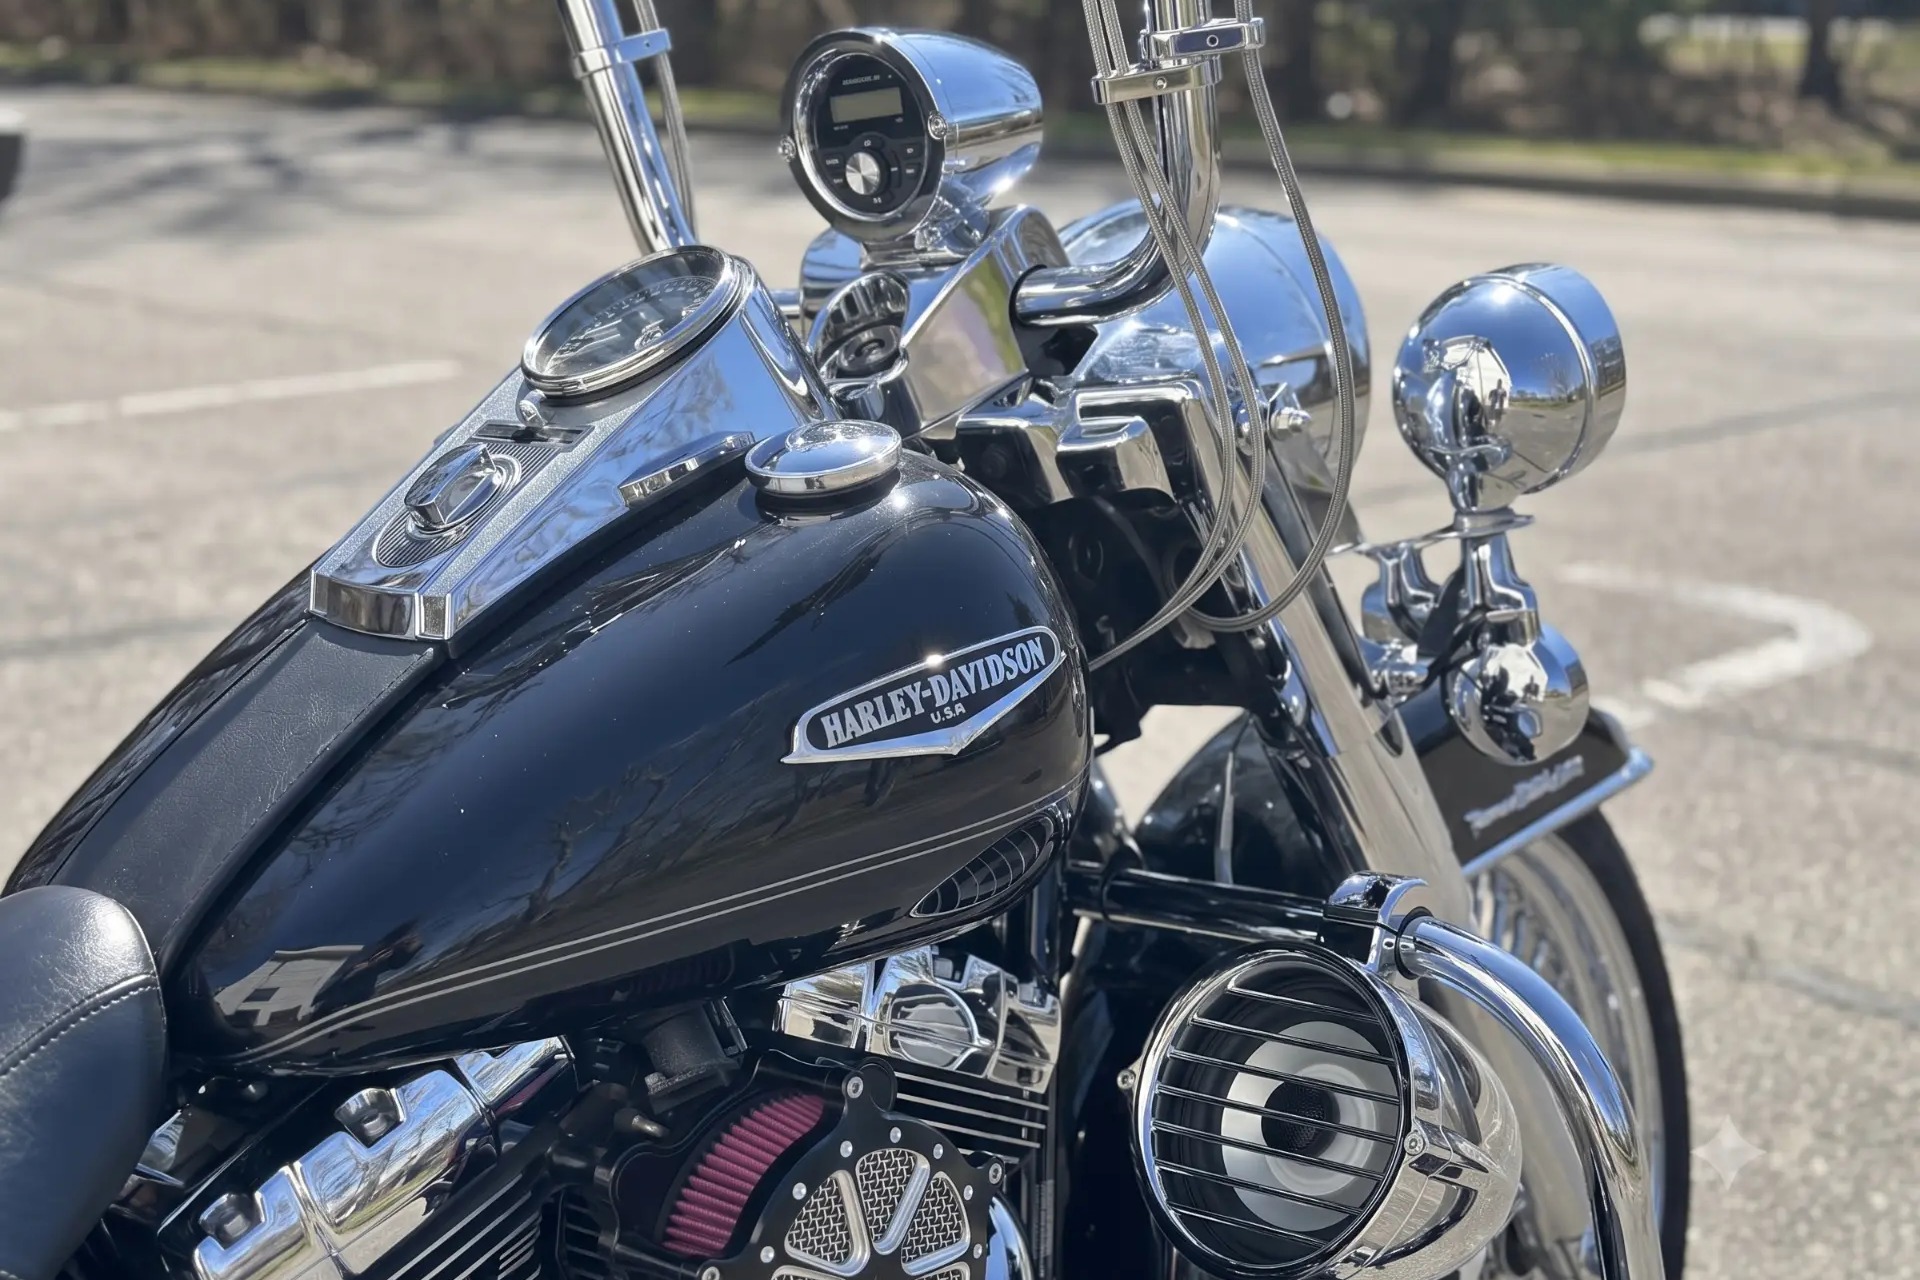
First, I should probably tell you up front what kind of person wrote this. I'm the guy who spends four months designing a bracket—not because a bracket is inherently interesting, but because the wrong one fits poorly, vibrates, or breaks your stuff, and I can't live with that. I'm the guy standing in the shop at 11:00 PM surrounded by a bench full of slightly different 3D-printed prototypes, wondering if I should run one more revision or call it a day. And I've pulled apart more wheels than I can count because an inner spacer was off by a thousandth of an inch and I could feel a slight drag on the bearings.
That's the disease. What follows is a symptom of it.
Here's the problem I started with. If you ride a Street Glide or a Road Glide, you have a stereo. Harley put a fairing on your bike, and a fairing is really just a dashboard — it gives you somewhere to put a screen or gauges, a stereo head unit, speakers, and something to hide the wiring behind. If you ride a Road King, a Softail, a Dyna or a Sportster, you have none of that. You have handlebars, a nacelle maybe, and about four square inches of real estate that isn't already doing a job. The aftermarket gave those riders two answers for stereo options. I didn't like either one – and neither did the customers who kept calling asking for something different.
These were essentially the two answers from the aftermarket:
- Put a fairing on it. That works, in the sense that you solve the unfaired problem. Bolt a batwing onto a Road King and you've got a Street Glide, though with the wrong badge. Take it back off and your stereo leaves with it, so you're back to a Road King with no stereo. I don't call that a solution.
- Let your phone be the stereo. Stick a Bluetooth puck (remote) on the bars, stream from your phone, call it a system. I rode that setup. If the phone stays in your pocket, you have no control other than momentary commands (usually just track next, play/pause, volume). If the phone goes on the bars, it has different challenges, especially in the rain, in gloves, at 70 mph. It's a frustrating workaround you have to manage. Either way, the remote on the bars is almost never the receiver, it's just a wireless remote control. The actual receiver is usually in the saddlebag. Bluetooth operates at 2.4 Ghz, and dense materials like ABS or fiberglass saddlebags weaken the signal, and weakened signals drop more easily. A Bluetooth handlebar remote solves the problem of reaching for a phone touchscreen with gloves, but it does not move the audio receiver to the handlebars. The physics of good audio quality work against you.
I wanted a third answer - a real Bluetooth head unit, permanently part of the motorcycle, with the receiver and the display in the line of sight on the nacelle or handlebar clamp - on a bike the factory never built one for. The rest of the Havoc architecture – speakers, amplifiers, etc., - flowed from that decision.
So that's the tour I want to take you on, in the order in which I actually had to solve it:
- The head unit. Why I insisted on a real one with a screen and a knob, what the trade-offs are, and why the Aquatic AV GP1 got the job.
- The housings. Why I decided to machine the pods from aluminum — and why they replace your nacelle cap or handlebar clamp rather than bolting on top of it.
- The speaker pods and their integrated clamp design, and why it matters at 80 mph.
- The amplifier, especially the ways the industry mounts an amplifier in a saddlebag, why I rejected all of them, and what I did instead.
Fair warning: this runs long, and I'm going to give you the trade-offs alongside the wins. I'll tell you what each one cost, in terms of opportunity costs for the customer, and also for me in terms of machining time and development costs (I spent 3 years designing these systems) but why I did it anyway. A design article that only lists advantages isn't an engineering document, it's a sales a brochure.
I wanted a real stereo head unit on an motorcycle without a fairing
Section 1
Why Havoc Roar Stereos Start with a Real Head Unit
My Design Criteria Table:
- Maintain Character
- Be respectful of the motorcycle. Don't turn an un-faired bike into a faired bike. Design the stereo so it looks like it could have rolled out of the factory with it on the bike.
- Wind Protection Independence
- The stereo system remains on the bike when the wind protection is removed.
- System Independence
- The stereo remains a fully functional stand-alone system (AM/FM radio, USB) even if your phone dies (or you decide to ride 1980's style and not be contacted - and goodness knows at least some of us sometimes want to do that).
- Bluetooth Stability
- Position the 2.4 GHz Bluetooth receiver directly in the open cockpit rather than burying it down low in a saddlebag or under a seat. Eliminates digital packet loss, audio stutter, and body-shielding dropouts at 70+ mph.
- Visibility
- The rider has line-of-sight visibility of the head unit display.
- Physical Accessibility
- Controls are immediately available from the riding position, including with gloves.
- Motorcycle Environment Compatibility
- The head unit has to be weatherproof to at least IP65, and ASTM salt, fog, and UV. Engineer to survive high-amplitude V-Twin engine vibration, harsh road shock, and direct thermal heat without plastic fatigue or thermal shutdowns
- Appearance
- Make the unit look like Havoc made it. Custom design, respect the lines of the bike, make the chrome real triple chrome plating, and make the black polyester powder coat.
- System Integration Architecture
- Scalable audio options right-sized for 2-speaker, 4-speaker, and 6-speaker configurations tailored to different riders' habits and highway speed demands
- Concealed Harness Integration
- Internal wire-routing channels machined directly into replacement nacelle caps and handlebar clamps. Eliminates exposed wiring to preserve a clean, factory-custom finish.
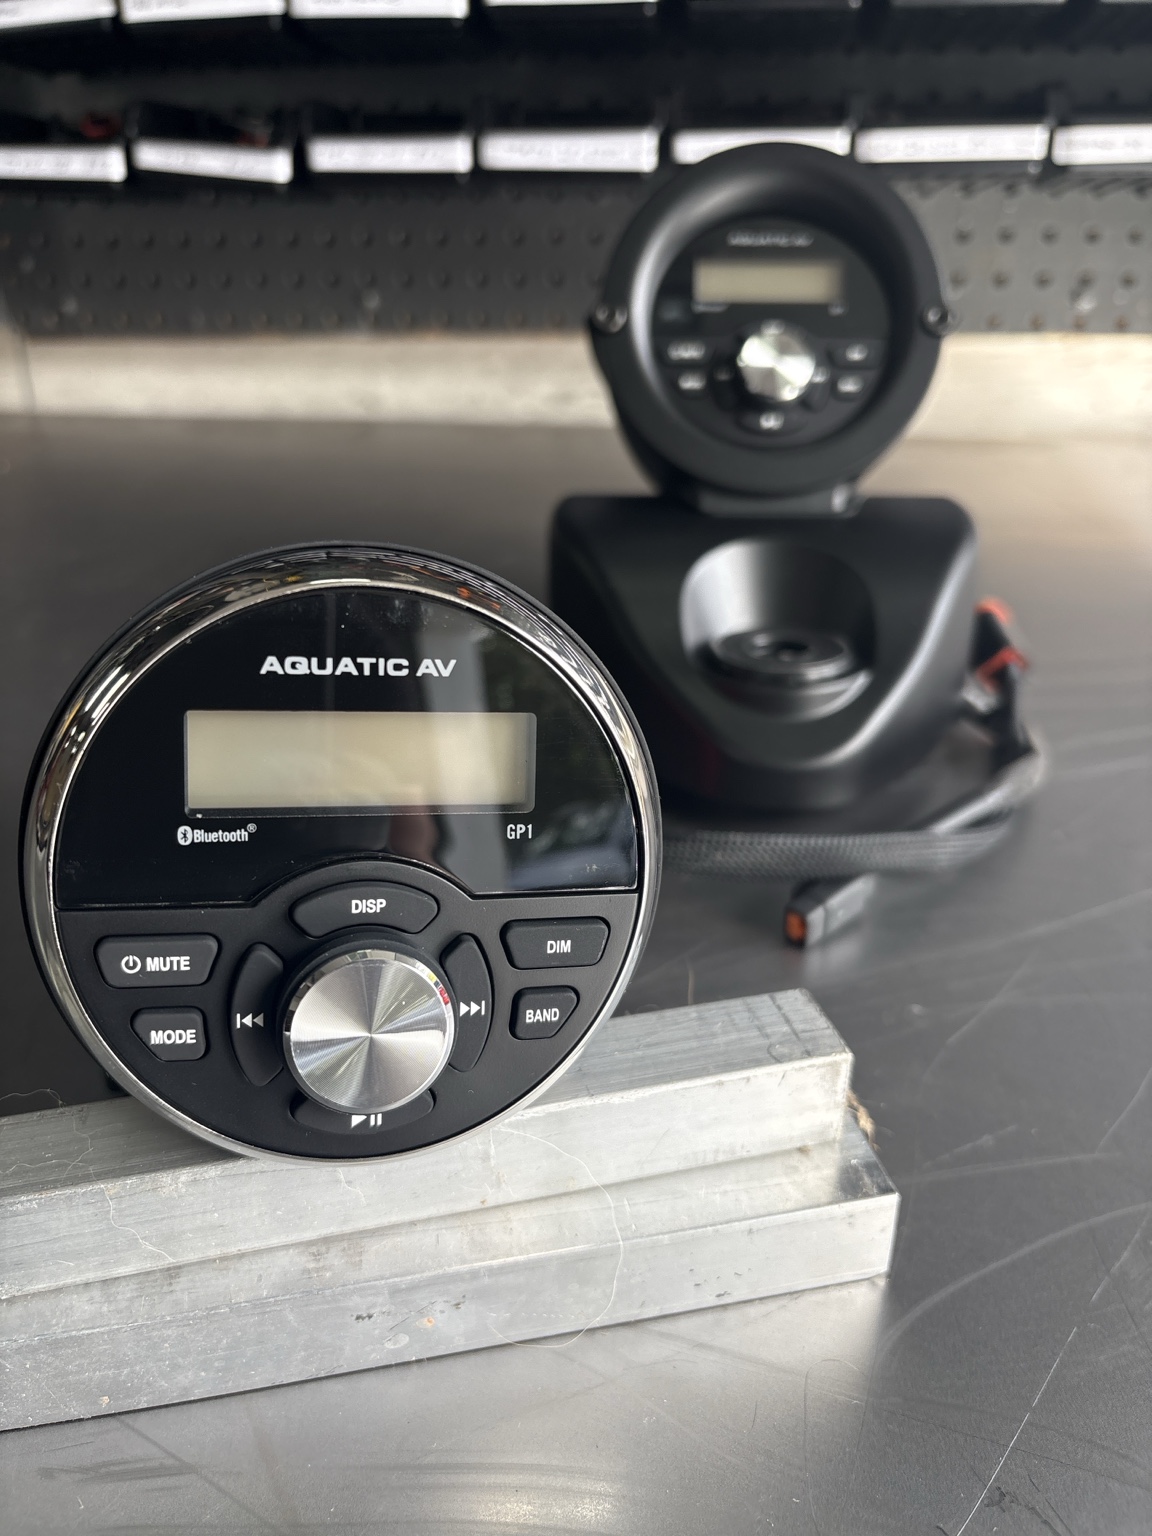
To make this vision work, we needed a head unit that was proven, rugged, and reliable. We chose the Aquatic AV GP1, for a couple of reasons: I know the product, and I know the people. Havoc has been the Canadian distributor for Aquatic AV in Canada for over a decade. Over ten years of distributing a line, you learn whether a product actually holds up in the field and whether the manufacturer stands behind it. Aquatic AV builds solid equipment, and their team operates the same way we do: they prioritize product quality and take care of the end customer. As a distributor, reliability and support is what made the decision easy.
The GP1 is a marine unit built on the exact same heritage as the AQ-MP-5BT-H – the Aquatic AV MP5 fairing head unit that Harley riders have used since 2014 and it won several industry and design recognitions when it hit the motorcycle market, most notably taking home NMEA (National Marine Electronics Association) Innovation & Product Awards.
The GP1 has the same internal 288W amplifier, marine-grade IP65 weatherproofing, UV and salt-fog protection, and intuitive menu layout, and it fits it into a compact 3-inch gauge footprint. It gives you Bluetooth multi-link, 2.1A USB charging, a 30-station AM/FM tuner, and 2-Ohm stable power output. My favourite: Turn on Hair Nation on the Sirius/XM app, Bluetooth it to the stereo and enjoy the ride.
By taking this path, we gave non-fairing riders the same integrated audio experience fairing bikes have enjoyed for years, engineered from the handlebars down specifically for the way you ride. We just had to get it on the bike.
Section 2
Machined Aluminum Housings: Respecting the Road King & Softail Silhouette
Which brings me to the next part of this design story: if you're going to commit to a physical head unit, how do you actually mount it without making it look like an afterthought?
Most aftermarket audio solutions rely on plastic, or metal that's been drawn into a cup shape. That means the brackets have to be bolted to the housing, and then bolted to the bike, and that extensive bracketry always looked awful to me. We had to treat the housing with the same respect for integration that Harley-Davidson uses to build the bikes. That meant we had to engineer the mounting points directly into the bike itself.
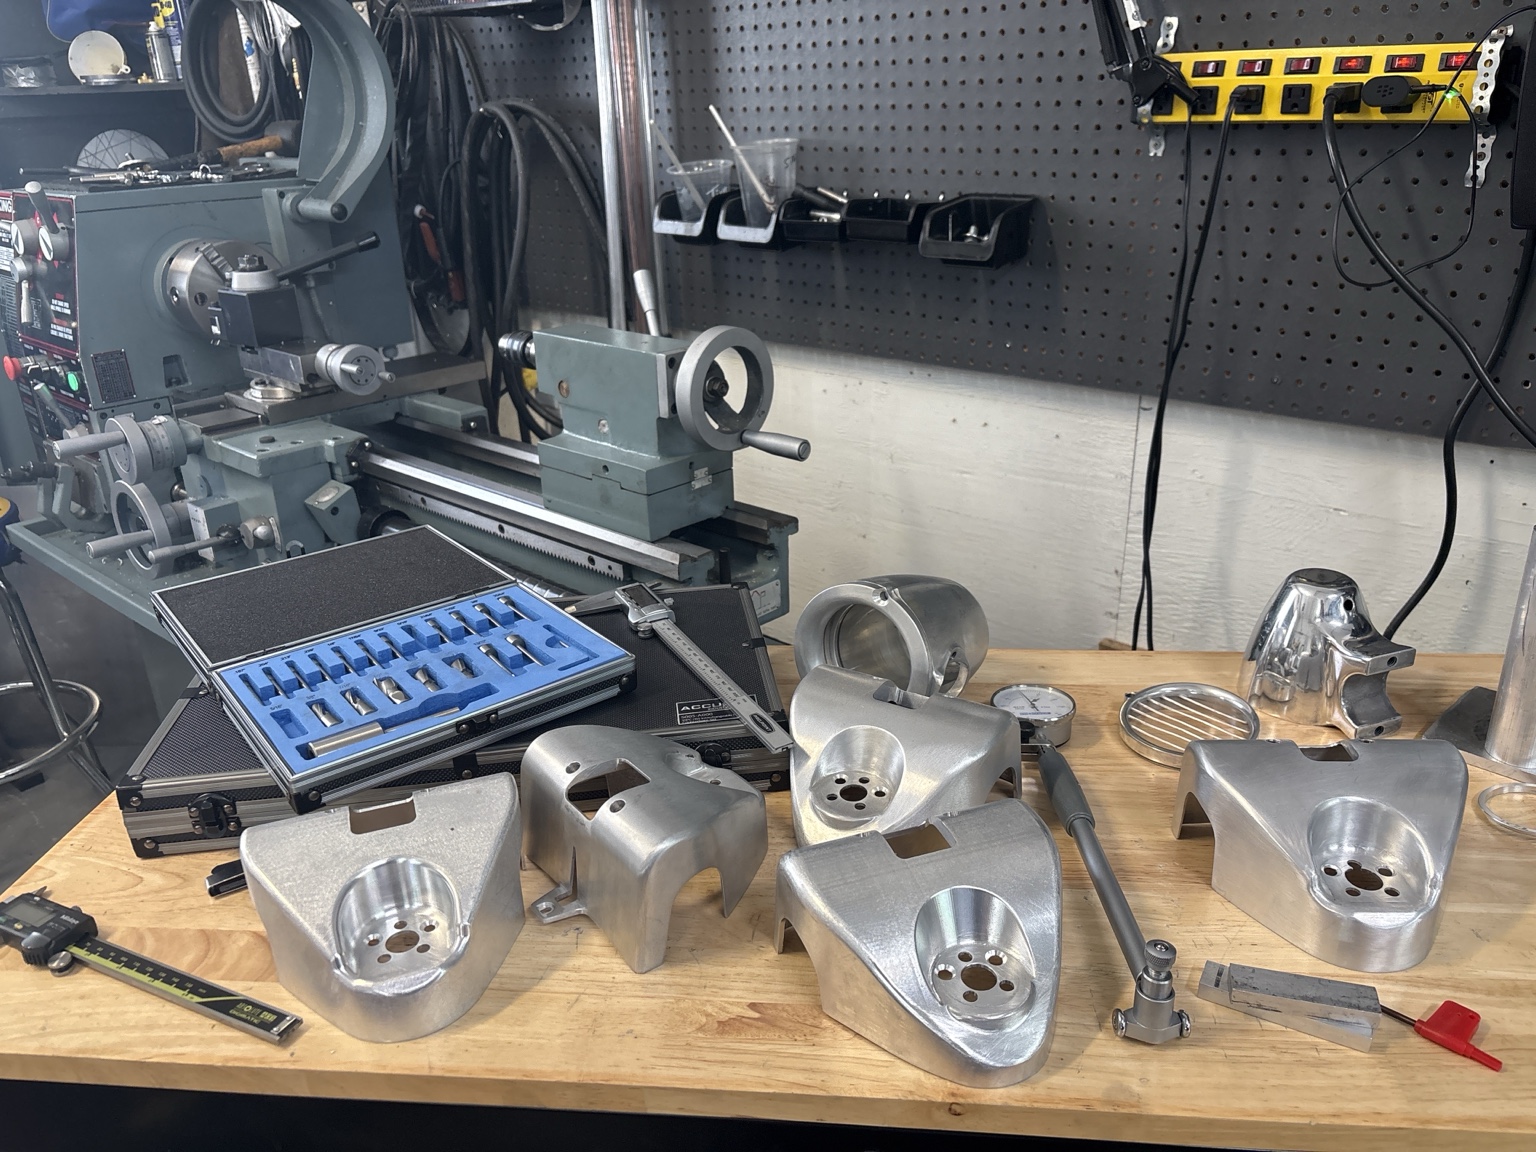
So, we decided to make custom gauge pods, and then engineered replacement components for the parts that were already doing a job on the bike: a replacement nacelle cap for the Road King, and replacement handlebar clamps for the Softail. (Actually, two replacement clamps—because around 2009, Harley decided to introduce a parallel bolt pattern alongside the perfectly fine offset pattern they had been using since 1975). So instead of adding an extra "clamp-on-top-of-a-clamp", we replaced an OEM part with a multi-functional, integrated component.
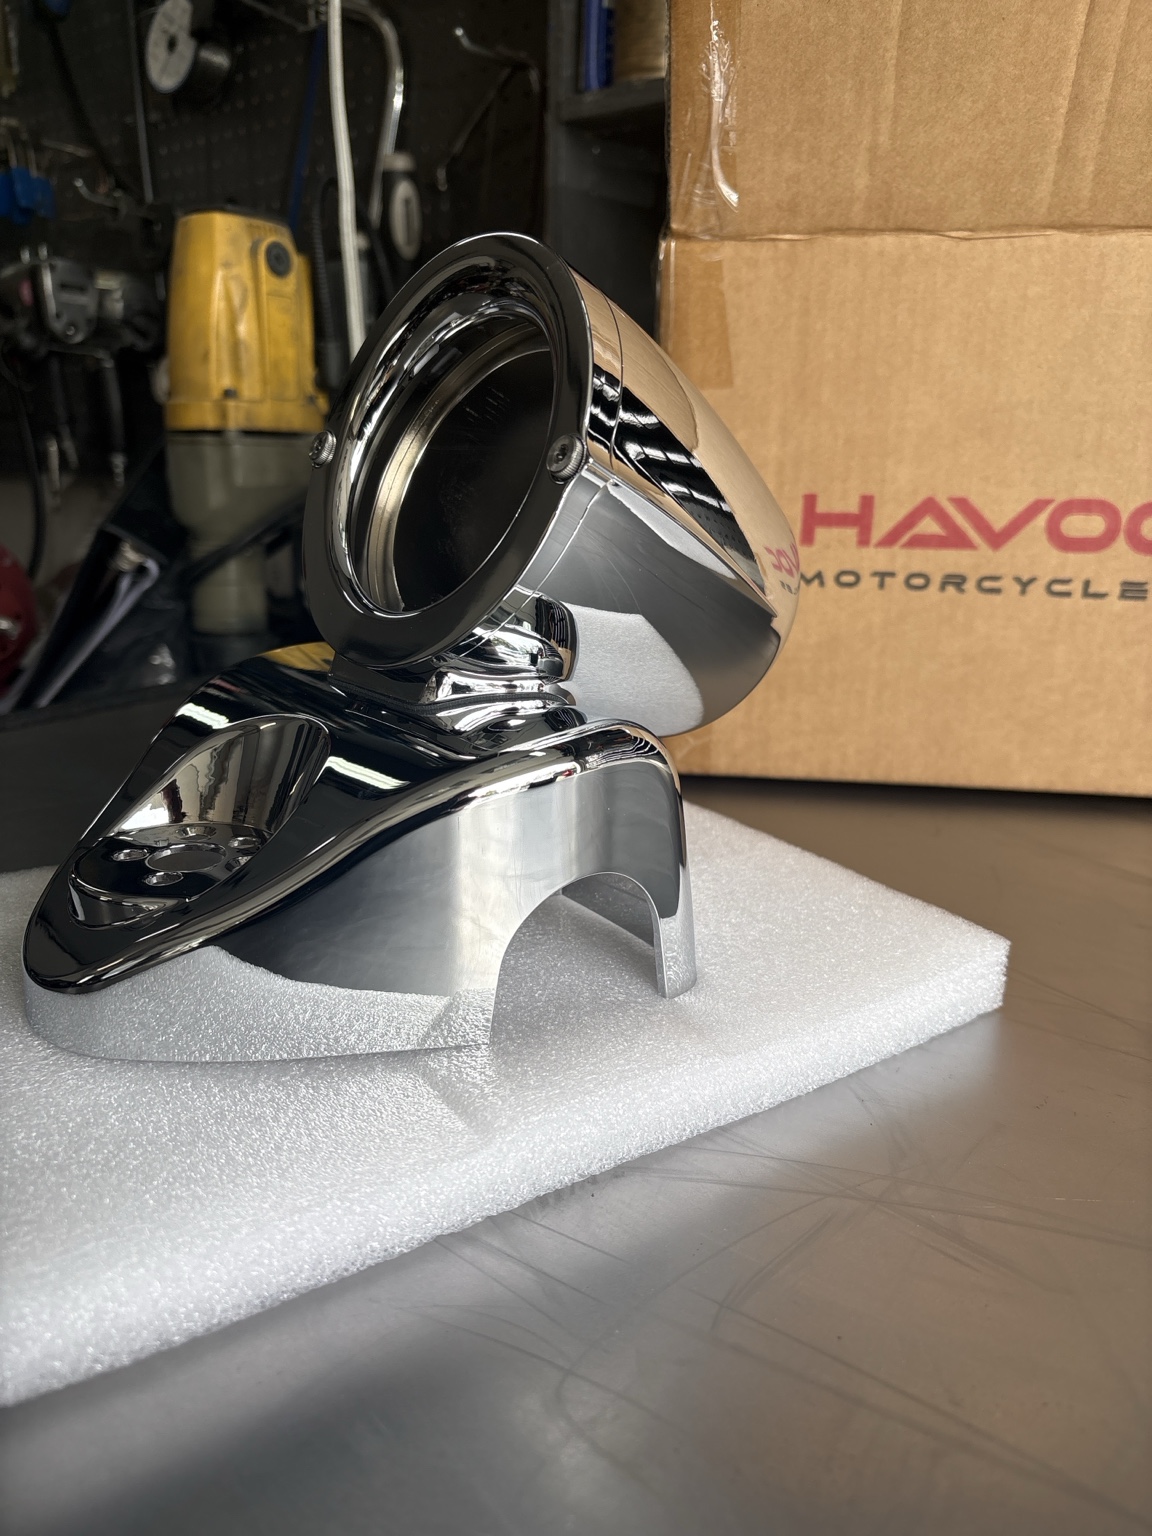
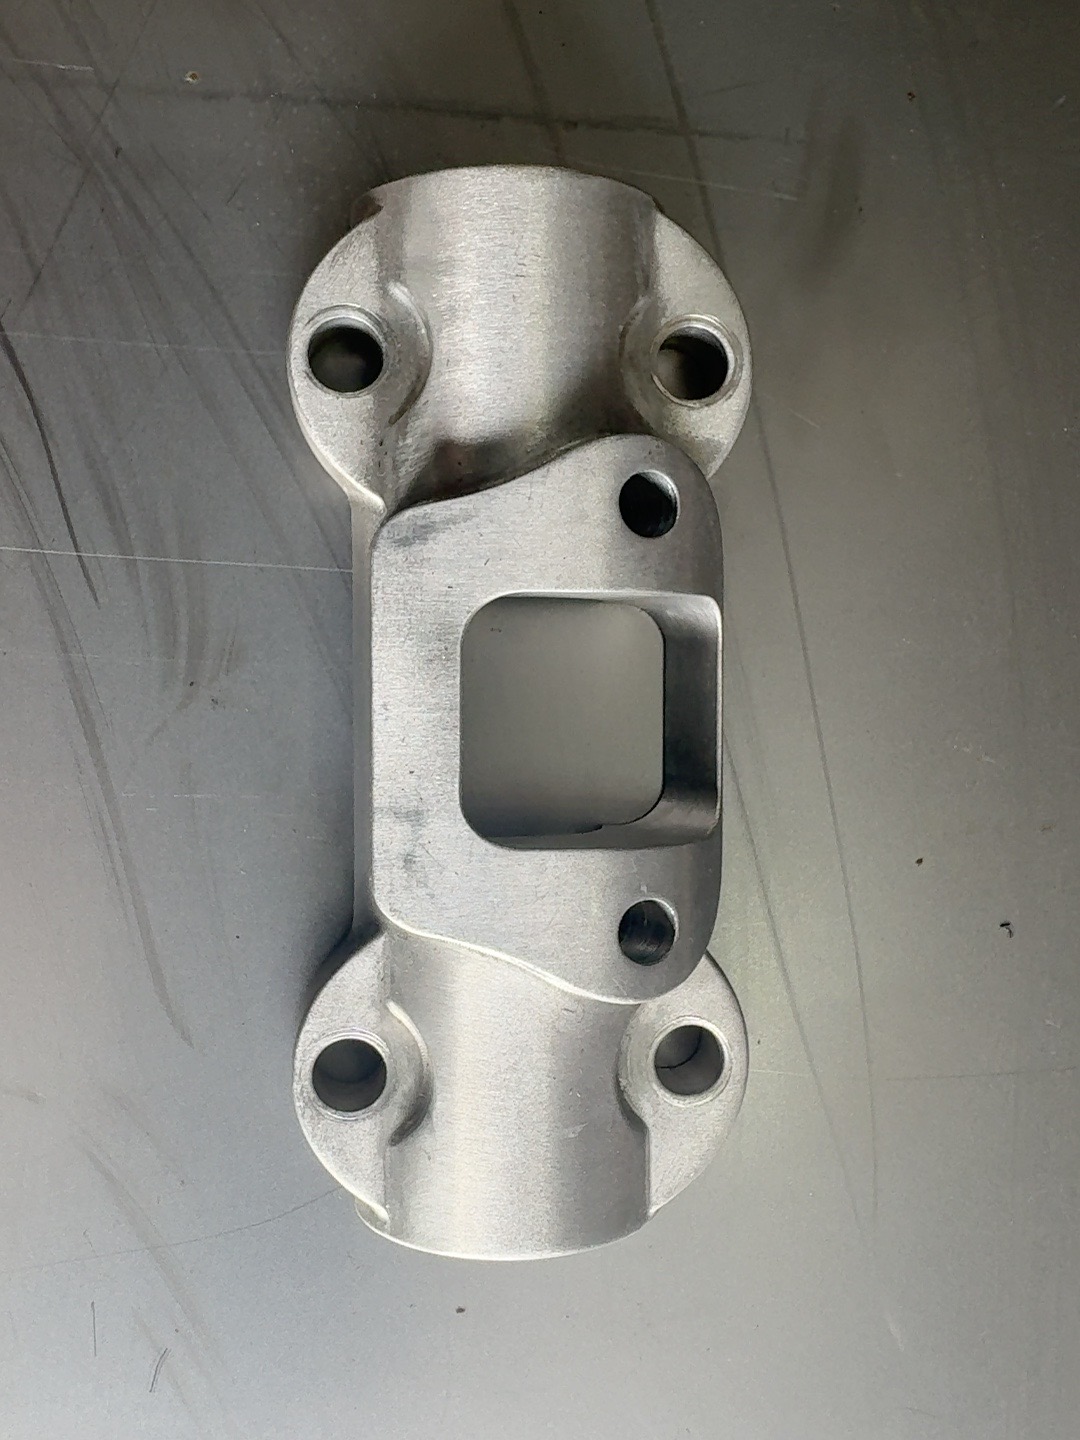
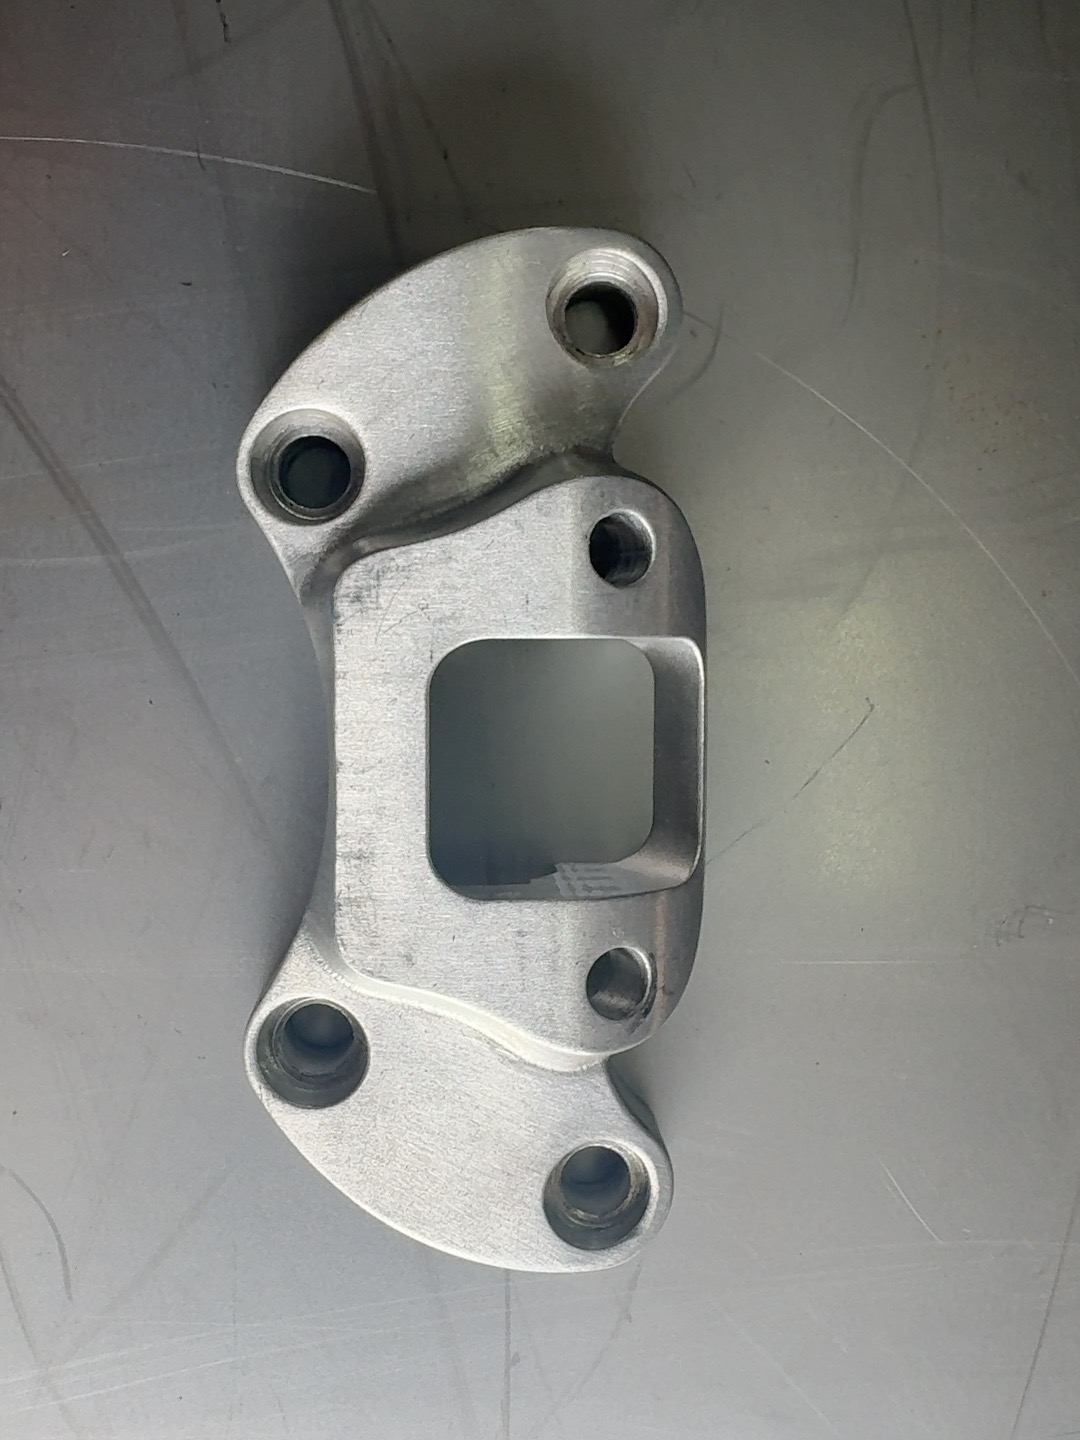
And, we decided to machine it all out of aluminum. Here is why we took that path, the benefits it delivers, and why the trade-offs were worth every minute in the CNC mill.
The Engineering Case for Aluminum
Machining our pods from aluminum gives us absolute structural integrity. A Harley V-Twin engine puts high-amplitude vibration through the handlebars and nacelle. I worried that a plastic pod or thin metal mount would fatigue, flex, or rattle loose over thousands of highway miles. Aluminum creates a rigid, vault-like housing for the Aquatic AV GP1. It is also the same material as the electronic heat sink, creating, in effect, one extended cooling machine for the stereo.
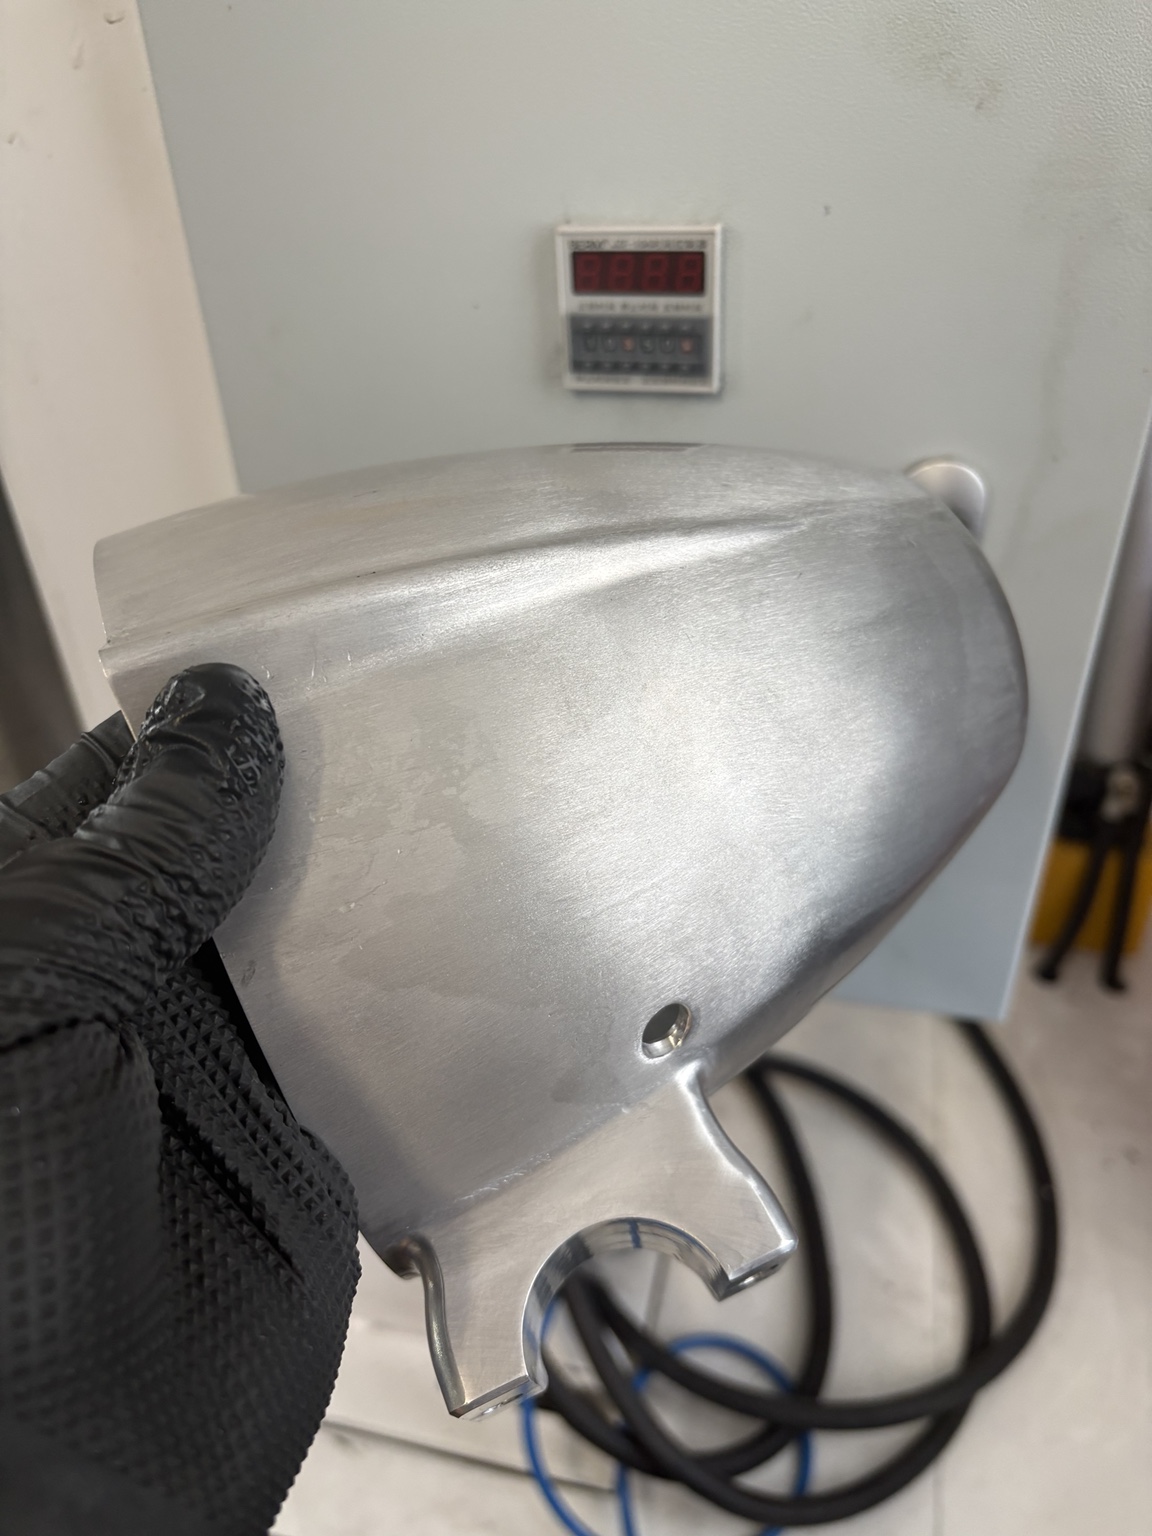
Aluminum also allowed us to vary the thickness of the material to keep it light where it wasn't structural, and add strength around the critical areas. This helps to dampen vibrations and protect the internal electronics while ensuring the head unit never moves. That was especially true at the clamp area, including on the speaker pods that I'll talk about later.
Integrated Motorcycle Design
There was also another thing important to me. The Road King has a classic body line right down the side of the nacelle – it's an unmistakable body cue that has been on that bike in different forms all the way back to the 1960 FLH Duo-Glide. That's when Harley first cast that sharp, horizontal side crease into the aluminum nacelle to give the front end a streamlined, muscular flow.
When we were shaping the Havoc stereo gauge pod for the Road King, I didn't want to break that silhouette. And here, kudos goes entirely to Andrew for the design work on that beautiful body line down the side of the stereo gauge pod. He picked up that original side body line and carry it forward, making the stereo look like a natural extension of Harley's classic nacelle geometry rather than a bolt-on. And because good industrial design doesn't stop halfway, we carried that same visual line through to the billet speaker housings. Every piece on the front end looks like it was drawn by the same hand, for the same motorcycle.
Concealed Wiring
One of the biggest eyesores with aftermarket motorcycle electronics is visible, messy wiring zip-tied along the handlebars. By replacing the factory handlebar clamp or nacelle cap with a custom billet component, we engineered internal wire routing channels directly into the metal. The wiring harness passes internally through the mount and under the nacelle on the Road King. On the Softail, it comes out the back of the pod and then down the risers and tucks underneath the tank. The Road King head unit wiring is invisible, and on the Softails it hides as much as possible, other than the speaker wire connections.
The Platform Approach (One Design Philosophy, Multiple Bikes)
We wanted a unified Havoc Roar Stereo architecture that could span across different Harley platforms without redesigning the core audio system from scratch. Machining bike-specific mounting interfaces—a nacelle cap for Road Kings and a clamp for Softails, Dynas, and Sportsters—allowed us to keep the underlying head unit, split-amplifier architecture, and wiring standards identical across models. The rider gets an identical, intuitive user experience regardless of which bike they ride, while the physical mounting feels completely bespoke to their specific model.
Section 3
Integrated Billet Speaker Pods vs. Universal Brackets
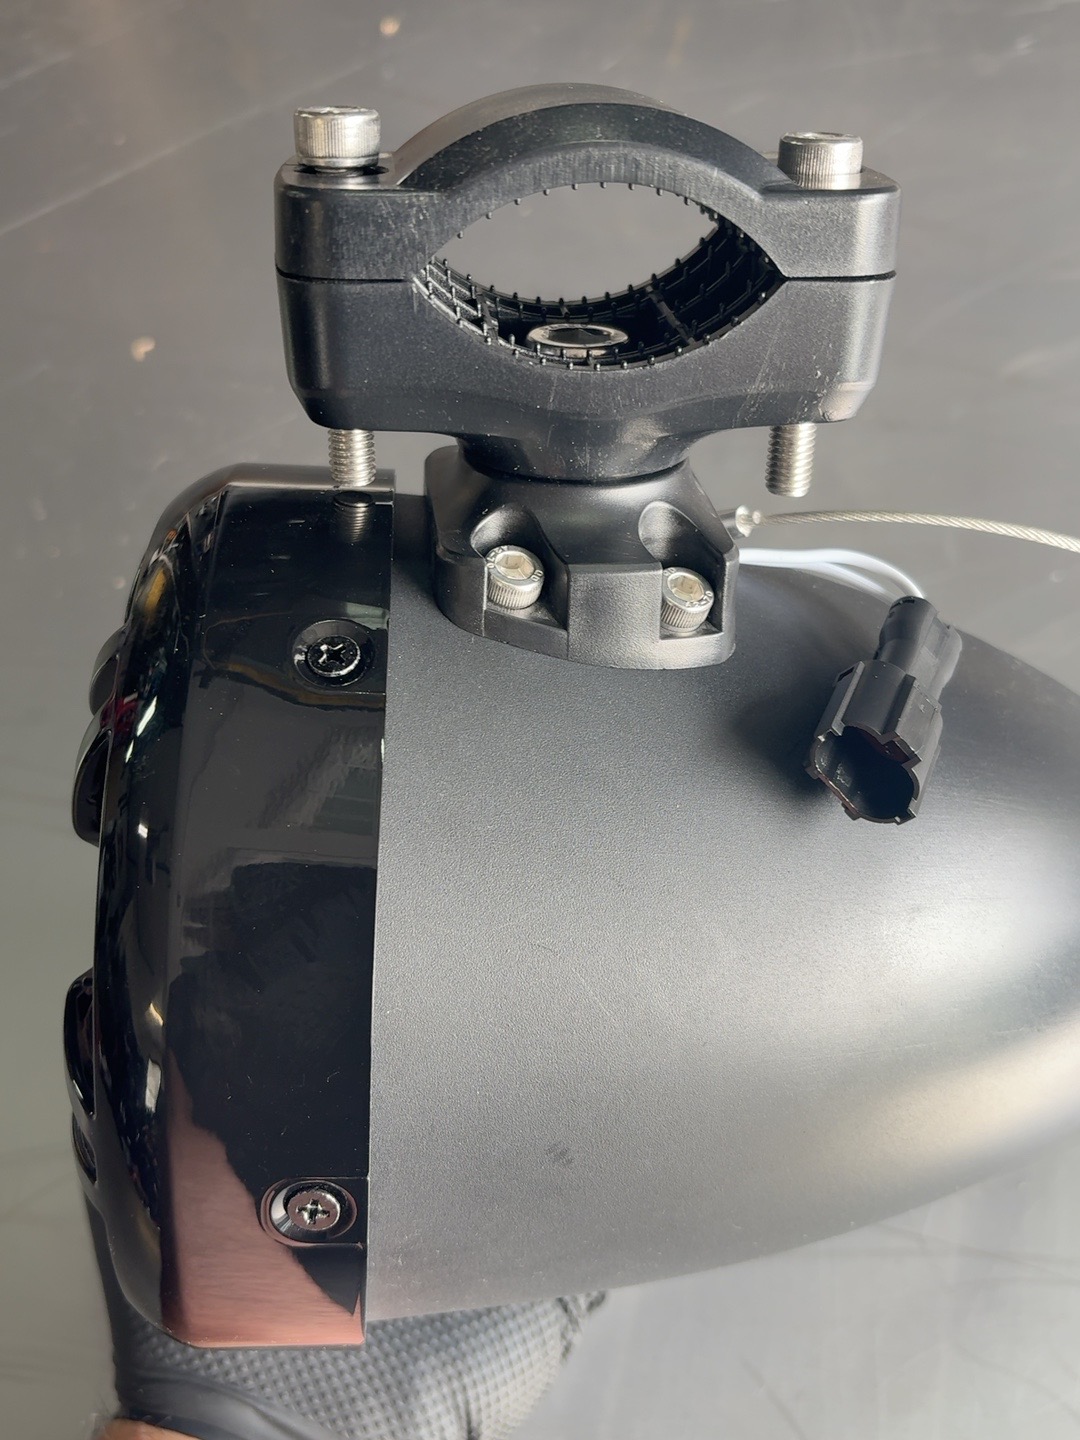
A picture is worth a thousand words. Look at the first image: a mounting foot bolted to the pod, which is then bolted to a hinged collar, secured with exposed hardware, with rubber shims that grab the bar. It all looks like a afterthought, protruding awkwardly off the tubing with hardware sticking out in every direction. That clamp architecture is the direct result of the manufacturing process decision for the pod itself.
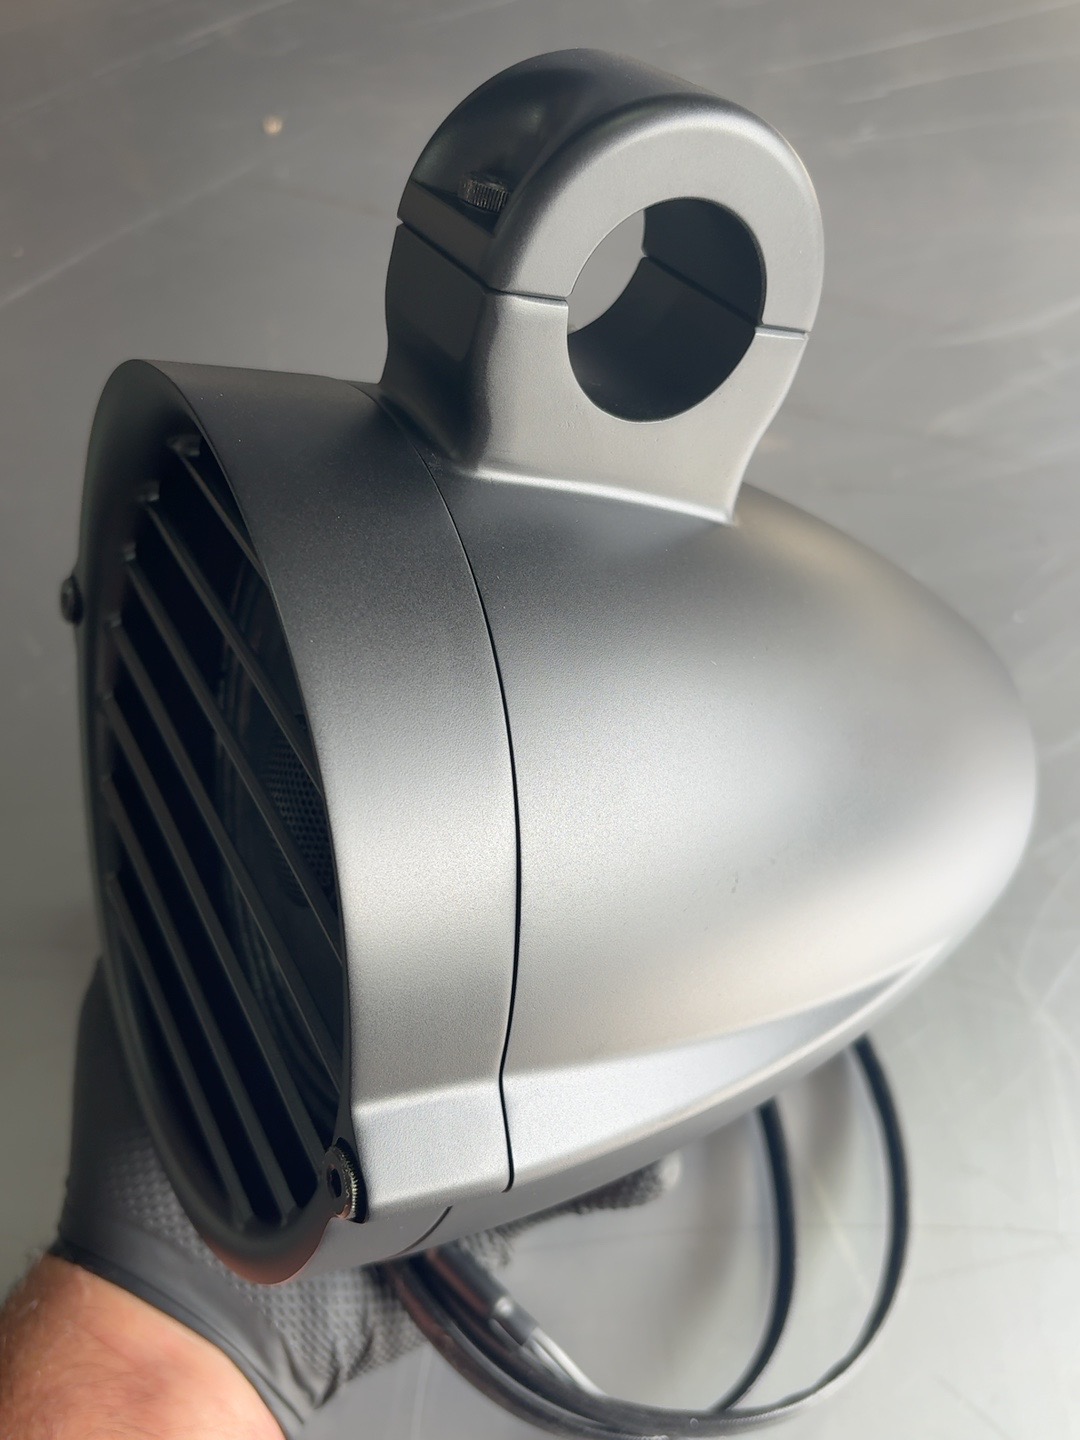
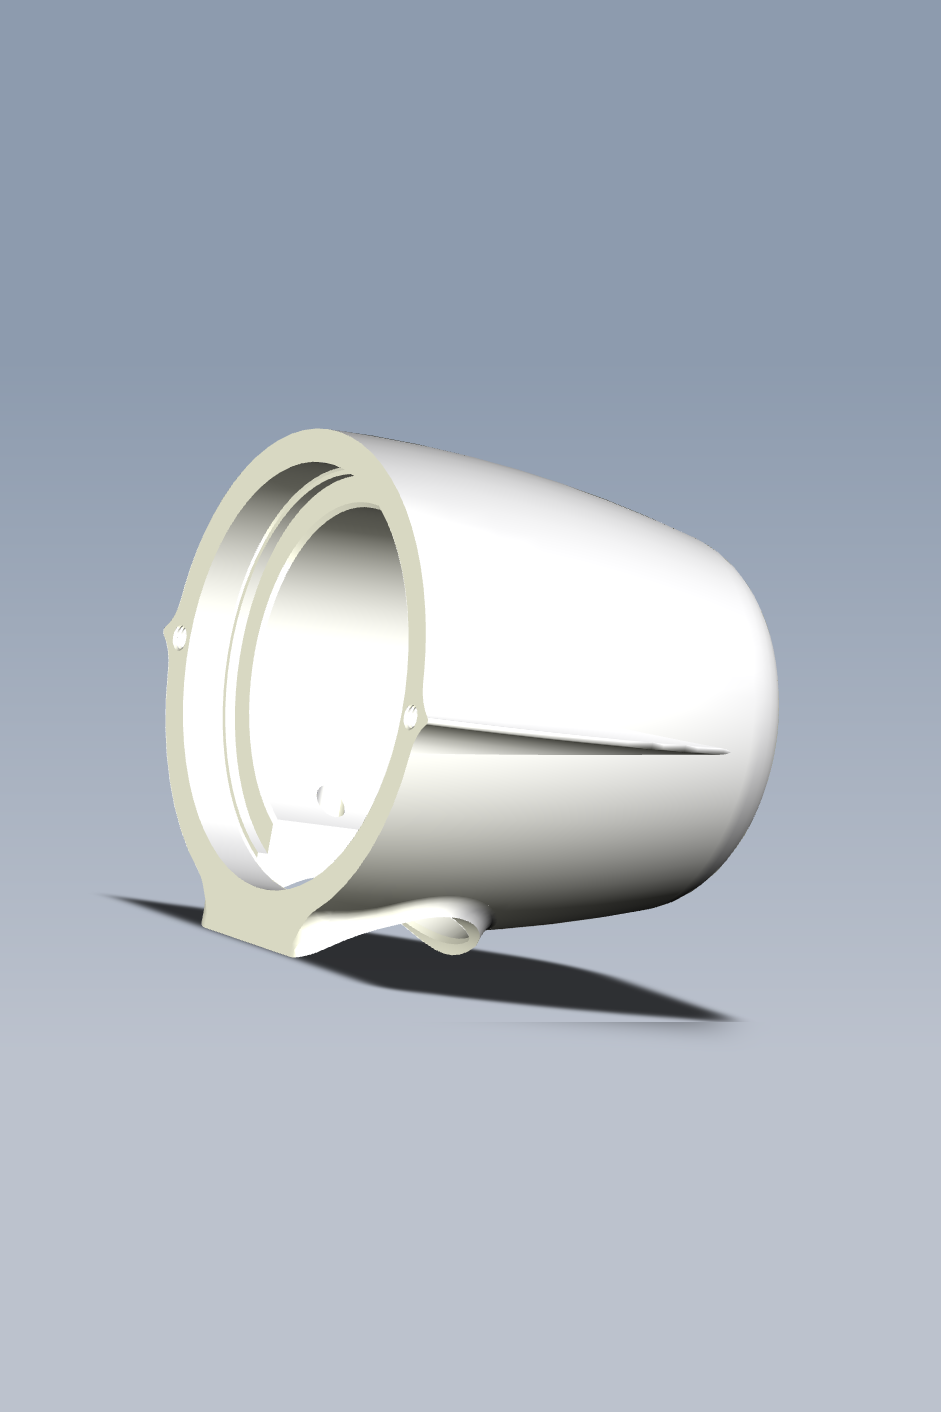
Because we chose to machine our enclosures, we were able to engineer an integrated clamp architecture. Look at the Havoc pod in the second image. The top half of the mounting clamp is machined directly out of the pod's structural body itself. The entire assembly flows as one seamless, continuous piece of metal. There are no stacked adapter plates, no universal collars, and no ugly hardware sticking out. It wraps around the handlebar or highway bar with a clean, factory fit that looks like it was poured right around the bar.
Using aluminum also meant we could machine that same signature horizontal body line directly into the side profile of the speaker pods. It picks up the design language of the head unit mount and carries that historic Road King nacelle shoulder line all the way through the entire audio system. For the Road King, every component—from the center display out to the highway bars—shares the exact same visual DNA. On a Softail, it just looks cool.
The trade-off, again, comes down to manufacturing complexity. Machining an integrated clamp directly out of a 6061-T6 solid billet requires significantly more material, longer CNC run times, and precise tooling tolerances.
But when you step back and look at the bike, the difference is night and day. You get unmatched structural rigidity that won't twist or vibrate loose at 80 mph, combined with a sleek, bespoke finish that treats your motorcycle like the custom machine it is.
Section 4
The Road-Lock™ Saddlebag Amplifier Bracket
Once we solved the cockpit control and speaker pod geometry, we had to deal with the amplifier. On a fairing bike, you just hide the amp inside the batwing or sharknose fairing. But on a Road King or a Softail, it has to go in the saddlebag. We're not the first or the only company to do that – Rockford Fosgate's Road King saddlebag stereo system has done it for years. But I did want to change the way it's done.
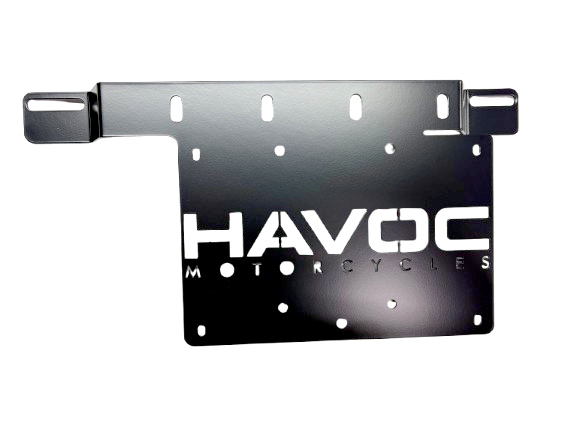
I bought a bunch of saddlebag amp brackets. One came with 3M tape that they wanted me to stick on the inside of the saddlebag. We all can guess what happens to that mounting system after a few rides and heat cycles on the glue – right, there isn't one anymore. Another one wanted me to punch holes in the back of the bag and bolt the amp to the ABS plastic. I've seen enough cracked bags to know that's not a good idea. So I decided to use the saddlebag's own mounting points. The result was the Havoc Road-Lock™ Saddlebag Amplifier Bracket.
The Road-Lock bracket is a single piece of 14 gauge steel that is laser cut into shape and CNC bent so it anchors the amp directly to the saddlebag's factory mounting points and clears the shock tower in the bag. We include a stainless clip nut and bolt with washers to replace the factory DZUS fastener, like the old “Bager Bolt” to lock the amplifier (and bag) in a precise, fixed position that won't shift. On the back panel, we laser-cut the Havoc logo directly into the steel. That isn't just branding—it trims unnecessary weight while opening up critical air pathways behind the amplifier chassis for passive heat dissipation.
The bracket for OEM leather bags like Heritage Softails is shallow. It holds the amplifier flush against the bag wall so it fits inside OEM leather or hard bags without bulging the outer shell or fighting the lid mechanism when you close it.
One of my biggest pet peeves with audio installs is keeping the wires tidy. But the solution is so simple. We just cut holes into the top of the bracket with places for zip ties. So all the wires in the bag route along the top of the bracket, and then cleanly through grommets to the rest of the system.
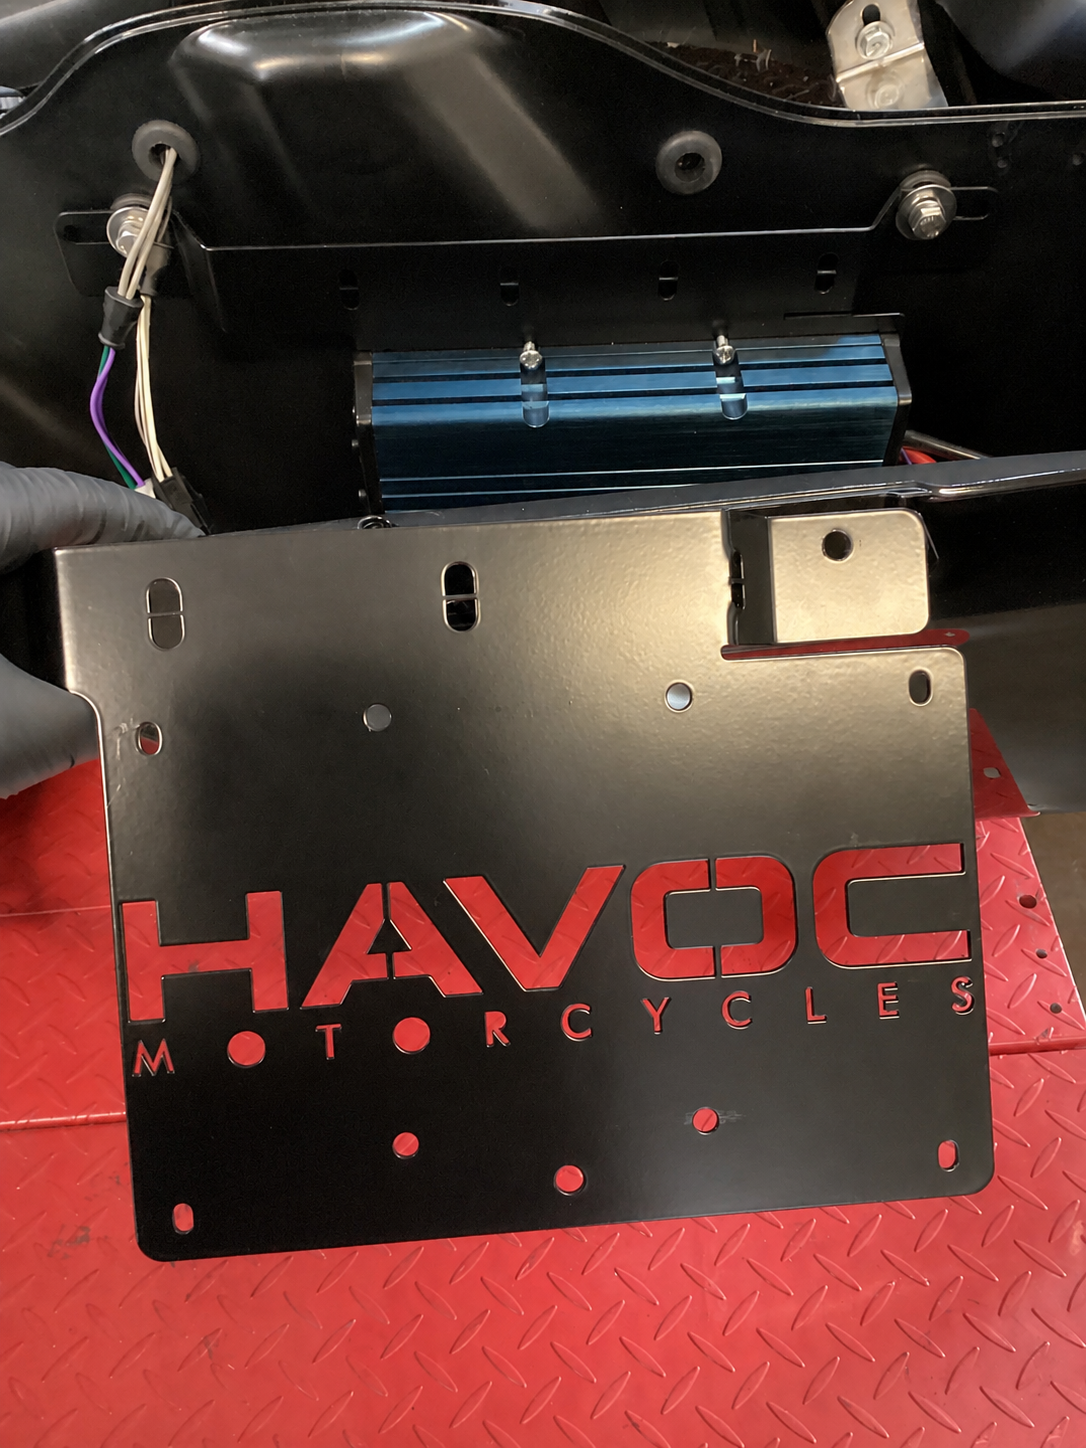
The trade-off here is that you give up some internal depth along one wall of a single saddlebag. But in return, you get a 100% secure, hidden, high-power amplification mount that protects your electronics, preserves your saddlebags, and maintains the clean lines of your motorcycle. And we can then use the full range of Aquatic AV's amplifiers, from the 2-channel AD300.2 all the way up to the new AD1200.4 for our 6-speaker 924.6 systems.
Section 5
Custom Aquatic AV Drivers & 241 Hz Differentiated Sound Stage
The last hurdle was the one on which I really wanted to concentrate maximum effort the speaker architecture itself.
Once we committed to a physical head unit, it allowed us to design a split architecture. We did not have to cram an amp and a Bluetooth receiver inside speaker enclosures, and that's a really good thing: speakers are essentially just air pumps and they have to breathe. That meant we could use purpose-matched speakers to the 300 watt, 500 watt, and 1200 watt amps, and also, importantly, to where they are located on the motorcycle.
Most aftermarket audio kits toss identical speakers into identical pods and call it a day. Hoppe Engineering is a notable exception – they differentiate their speakers by using two 5” in the upper section and two 6” speakers in the lower section of the fairing. So when you look at their 4-speaker fairings, you see real acoustic intent. They engineered an enclosure that handles distinct speaker positioning within a fairing shell because they understand sound stagings. I give them credit for that – though it is acoustic intent solving the problem inside the shell we set out to do without.
The others that put four of the same speakers on a motorcycle make a fundamental engineering mistake. High frequencies (the vocals, crisp cymbals, and detail) need directionality up near your ears, while mid-bass requires cone area and displacement down lower to punch through 70 mph wind and exhaust roar.
I didn't want four of the same speakers screaming the same frequencies at your chest. I wanted a true, differentiated high-frequency and mid-bass component system—with all four speakers aimed directly at the rider's ears.
Calling Aquatic AV: Asking for the Impossible
We started with a DC Gold N4R 4” speaker on the handlebar – a thing of beauty hand-built by David and Laurie over at DC Gold in California. They are fantastic people who build incredible drivers, but unfortunately, a 4-inch frame proved just a bit too big for the tight clearance between our mid-mounted head unit and the bar uprights on OEM Harley bars.
I searched every audio catalog on the market for a 3.5-inch handlebar driver that could handle real power, deliver crystalline high-frequency detail, and survive being bolted to a vibrating Harley handlebar in the pouring rain. It didn't exist. Everything available were cheap marine speakers that distorted under power or delicate drivers. I bought them all. (We have a separate tech article detailing how those so-called "1,000 Watt" handlebar speakers are pure marketing fiction.)
So, I picked up the phone and called Bob Fils, owner of Aquatic AV, and asked if he could help. Being the great guy that he is, he helped lay out the specs: a 3.5-inch driver built around a massive 35 mm voice coil and core - nearly half the cone diameter - for genuine power handling, fully sealed waterproof construction, and a rigid cast-aluminum basket. Apart from top-tier drivers like DC Gold, almost every other handlebar speaker on the market uses a cheap plastic basket. On a Harley, a plastic basket flexes under high V-Twin vibration, robbing you of clarity and distorting the sound. A cast-aluminum chassis stays rock-solid, ensuring every bit of magnetic energy goes into moving air rather than flexing plastic.
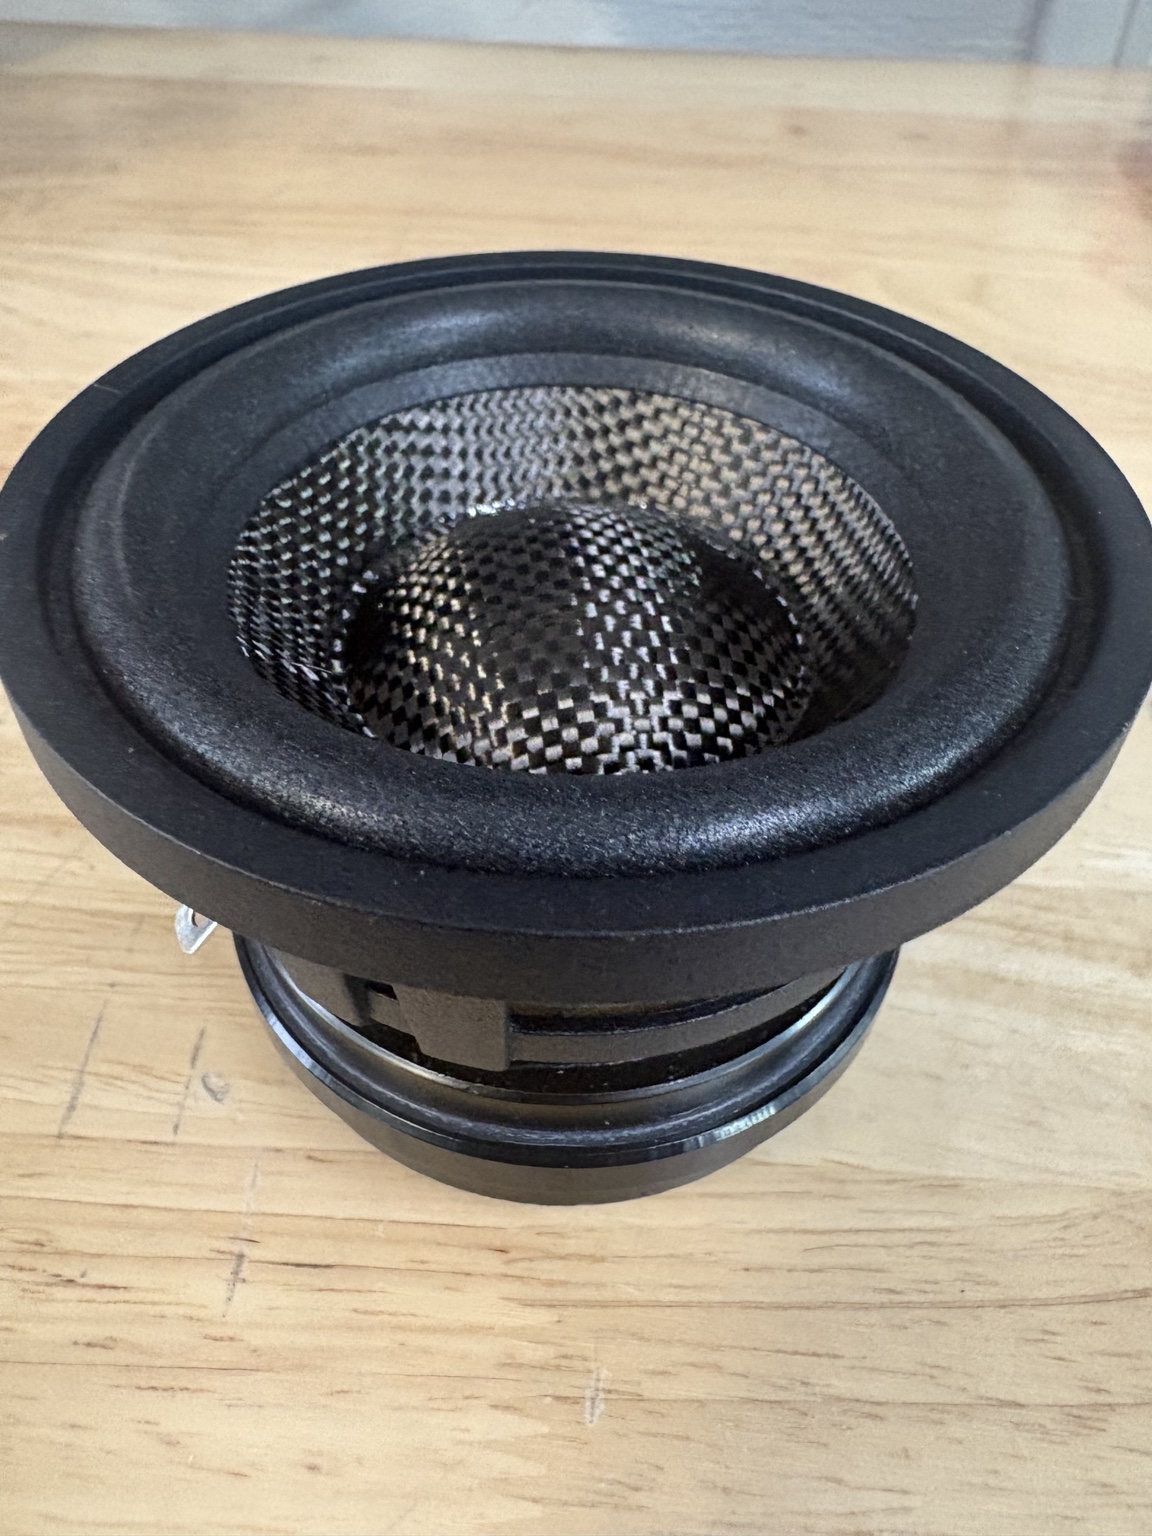
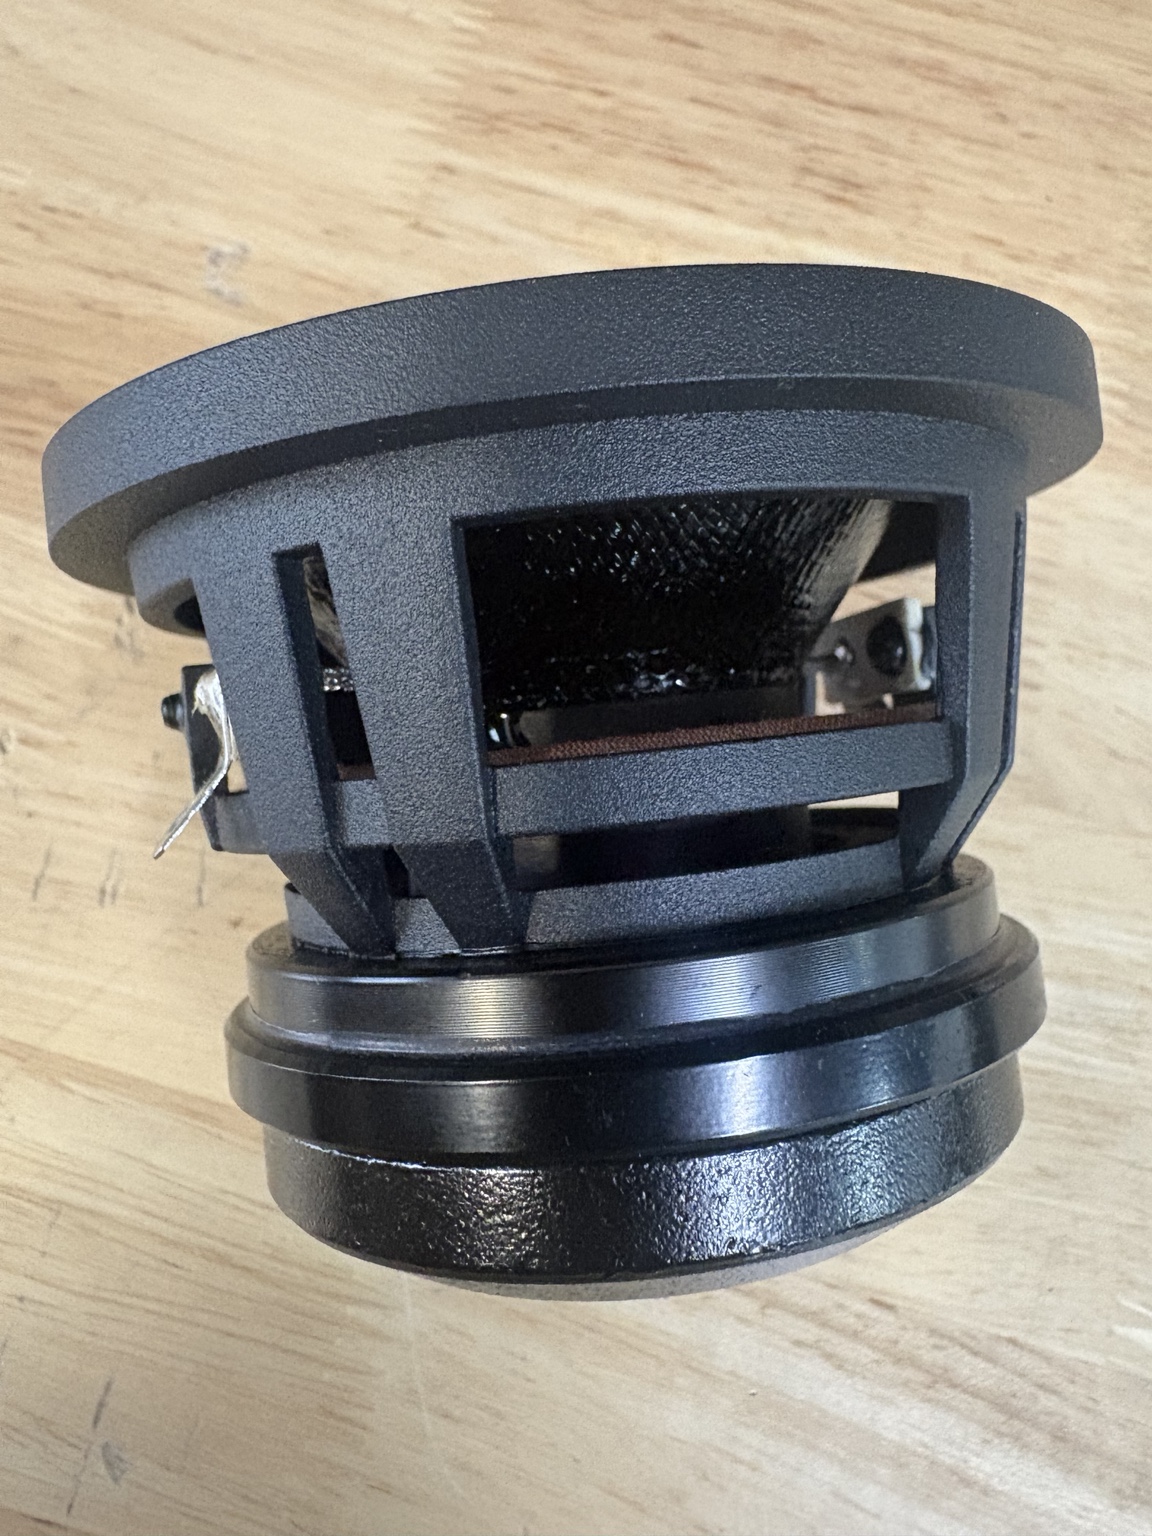
Once we had the custom 3.5-inch drivers, we went through the frequency distribution. I called companies in Germany, the US, and Japan and settled on a Nichicon ES bipolar electrolytic at 330 µF. Into the driver's 2-ohm nominal impedance, that sets the high-pass corner at 241 Hz. It is a first-order filter, so it tapers rather than cuts — about 3 dB down at 241 Hz, 7 dB down an octave below. That is exactly what we wanted. It unloads the cone of excursion on which it would otherwise waste power, and lets the handlebar drivers put their output into midrange, vocal presence and high-frequency detail: the content wind noise takes from you first.
First-Order High-Pass Response — Nominal 241 Hz Corner
Then, we hand off the heavy lifting to the highway bar pods. Down below, we pack Aquatic AV 6.5-inch speakers punching out a full 100 Hz to 20 kHz frequency response. My favourite are the 480 Watt HS116Neodymium magnets which give us massive magnetic force and deep mid-bass punch in a lightweight, compact package.
The Sound Stage: 4-Point Rider Alignment
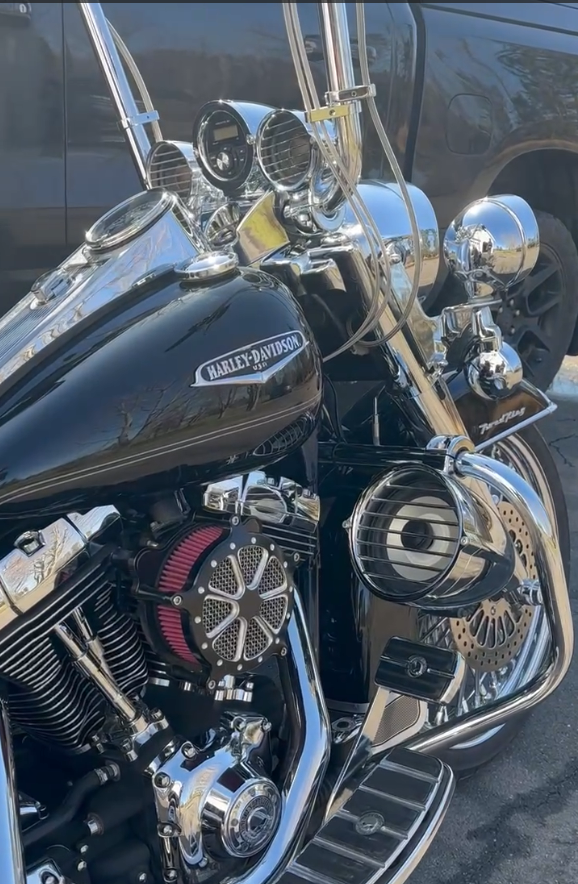
The result of all that testing and custom manufacturing is a true 3D sound stage on a non-fairing bike:
- At the Handlebars (Up High): the high-passed 3.5-inch drivers carrying midrange, vocal presence and high-frequency detail, up at ear level where wind noise does the most damage.
- At the Highway Bars (Down Low): Punchy, full-bodied 100 Hz mid-bass and mid-range driving up from the lower frame.
- Positioning: All four speakers are angled and aimed directly at the rider's seating position.
Section 6
Welcome to Havoc Roar: Built for the Open Road
When you add up every single piece of this design puzzle—the dedicated head unit, the billet aluminum nacelle caps and handlebar clamps, the integrated speaker pods, the Road-Lock™ saddlebag bracket, and those custom 3.5-inch drivers Bob built for us—you see what Havoc Roar Audio is really about.
We didn't set out to make an "easy" audio kit. We set out to build the absolute finest, cleanest, and hardest-hitting open-cockpit audio system ever put on a Road King or a Softail.
Every angle on the CNC mill, every Hz on the crossover, and every late night in the shop was done with one thing in mind: that exact moment you pull onto the highway.
Every angle on the CNC mill, every Hz on the crossover, and every late night in the shop was done with one thing in mind: that exact moment you pull onto the highway. When you're rolling at 75 mph with the wind in your face and your favorite track coming through with razor-sharp clarity, every single detail makes sense.
I couldn't be prouder of what we built here at Havoc, and I can't wait for you to hear it on your own bike. Welcome to Havoc Roar. Let's ride.
More from the Tech Center: Audio Tech · Tech Center